

How to Use the IMAP Sync Feature in DirectAdmin
You can now migrate your emails over to our servers utilising DirectAdmin’s new IMAP sync feature.
What is IMAP sync?
IMAP stands for Internet Message Access Protocol. IMAP sync allows you to synchronise your emails from one server to another, which is very useful when trying to move emails from one provider to another.
Please note that there are some conditions to be able to use this tool:
- You need to have your old email server’s IP or server settings.
- Your old email service needs to support IMAP.
Follow these steps to use the IMAP sync feature in DirectAdmin:
1. Log in to your DirectAdmin account. Click here for instructions on logging in to your DirectAdmin account.
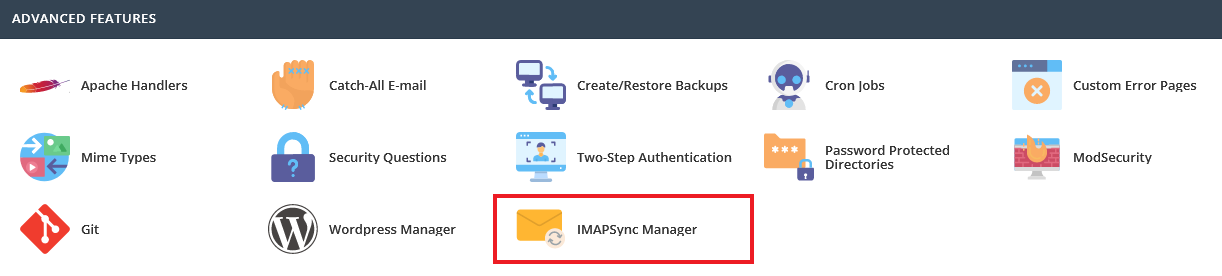
2. Once logged in, scroll down to ‘Advanced Features’ and click on the IMAP Sync Manager icon.
3. The IMAP Sync page will open; this is where you can start to import emails. Click the Import Emails button on the right-hand side.

4. Now, you need to fill out the details to proceed. These details consist of two sections — Source and Destination. ‘Source’ refers to where the email is migrating from, and ‘Destination’ is where the email is migrating to.
Source

Host: The server address you will be migrating from; this can serve as an IP or a DNS record pointing to your old email server. Also commonly known as your ‘incoming server settings’ from your old provider.
- Typically, this will be ‘mail.yourdomainname’, which will only work if the record still points to your old email server.
- If you used GSuite as your email provider, the server settings would be ‘imap.gmail.com’.
- If you used Microsoft Office 365 as your email provider, the server settings would be ‘outlook.office365.com’.
If you are unsure which server settings to use, please raise a support ticket from your MyDreamIT account to our support team can assist you further.
User: The email address you wish to migrate the emails from. For example, ‘admin@exampleimap.com’.
Password: The password you used to log in to your email address while with your old provider.
Destination

User: There will be a dropdown box for the ‘User’ section, allowing you to select the email address within your account.
Authentication: This section confirms how to access the email address of the server you are migrating to. As the email exists within the account, you can leave it as the default option ‘Internal sign in’.
However, if you still wish to authenticate using a password, you can select the password radio button and enter the password you use to log in to your email address on our server.
5. Once you have entered all the correct details, click the Start Migration button. The IMAP sync will run in the background and notify you when completed.

If you receive an error message whilst trying to migrate the emails, please raise a support ticket to our team. Include a screenshot of the error message you get when trying to migrate the emails and the IMAP sync settings you have entered into the migration form.
Click here to view DreamIT Host’s Email Hosting plans.
Leave a comment
You must be logged in to post a comment.