How to Create a Reseller Package (DirectAdmin)
As a reseller, you can create custom packages via your DirectAdmin reseller account for your clients with specific resources assigned to each package.
For example, you can offer basic, essentials or premium packages — basic plans include the least amount of resources such as disk storage, number of email addresses and so on, whilst the premium packages include more resources.
Follow these steps to create a package within your DirectAdmin reseller:
1. Log in to your DirectAdmin account. Click here for instructions on logging in to your reseller account via DirectAdmin.
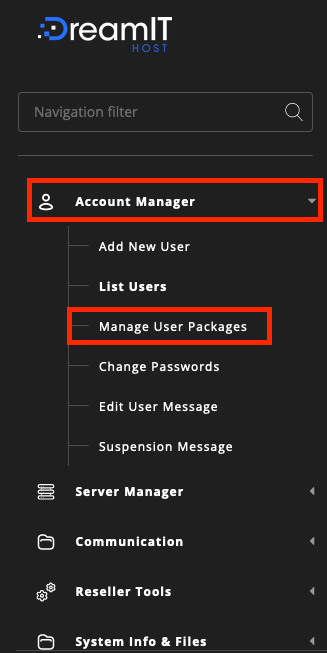
2. Once logged in, click the Account Manager dropdown on the left-hand side, then select Manage User Packages.
3. On the top right-hand side, click the Add Package button.
4. In this section, fill out the package details (the resources and settings you want to be applied for this package).
- Bandwidth: Bandwidth measures the amount of data that the account can transfer.
- Disk Space: The amount of storage you want to be associated with the package i.e. 10240 MB (10GB)
- Inode: This is the limit for the number of files the account can have in total within their account
- Domains: The number of domains the user can add to the account
- Sub-Domains: The number of subdomains that can be created/added to the account.
- Email Accounts: The number of email accounts the user can create.
- Email Forwarders: The number of forwarders the user can have on the account.
- Mailing Lists: The number of mailing lists the user can have on the account.
- Autoresponders: The number of responders the user can have on the account.
- MySQL Databases: The number of databases the user can create on the account.
- Domain Pointers: The number of domain pointers the user can have on an account. (A domain pointer is an additional domain name that points to the root of your site.)
- FTP Accounts: The number of FTP accounts the account can have.
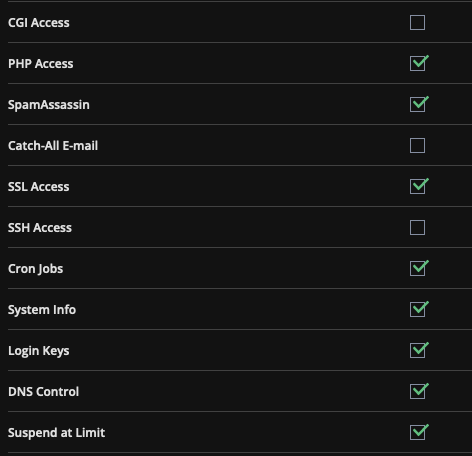
- CGI Access: The common gateway interface (CGI) is a standard way for a Web server to pass a Web user’s request to an application program and to receive data back to forward to the user. (It is recommended to leave this option enabled.)
- PHP Access: The setting allows the user to access the PHP settings within their account.
- SpamAssassin: The setting allows the user to access the Spam filter within their account.
- Catch-All Email: The setting to enable the Catch-All Email function within their account.
- SSL Access: The setting allows the user to access the SSL settings within their account.
- SSH Access: The setting to allow the user to have SSH access.
- Cron Jobs: The setting allows the user to access Cron Jobs for their account.
- System Info: The setting allows the user to view the System Info within their account.
- Login Keys: The setting allows the user to create Login Keys (also known as an API token — a password that allows users to log in to their control panel).
- DNS Control: The setting allows the user to access their DNS settings/Zone records within the account.
- Suspend Limit: The setting suspends an account once it has exceeded the disk quota or bandwidth. (Please note: This is a global setting, and the functionality is disabled.)
- Skin: The theme of the control you want the package to have.
- Language: English.
- Home Directory: Set the preferred directory you want the accounts on. (This should always be set to /home.)
- Acronis Backup: The setting to enable Acronis Backup within the account. (Self-service backup feature.)
- Dream Website Builder: This setting enables the website builder app within the account.
Feature Sets
- Policy: The setting to enable/disable DirectAdmin essential functions. (Recommended to allow all)
Plugins Allow/Deny
- Policy: The setting to enable/disable plugins provided by DreamIT (Recommended to allow all)
- Package Name: The name you want to name the package.
5. Once all these settings are filled out, click the Save button when all settings have been filled out.
Leave a comment Cancel reply
You must be logged in to post a comment.